I wrote this article because the “Earl password cartoon” and article actually identified the real challenge at the heart of this whole exercise: the more complete and useful your information/instruction letter is, the more dangerous it becomes if it falls into the wrong hands. A document good enough to hand your whole financial life to your spouse and kids is also good enough if you unknowingly hand it to a stranger. That’s not a flaw in the strategy; it’s the nature of the problem.
I like this kind of stuff because, as a former IT architect, I get to apply my experience to everyday problems. So, I want to start with a basic high-level ”architecture” of what I’m going to call your ”personal information security domain.”
In many ways, this is similar to how businesses view their internal security challenges, but theirs is more sophisticated and complex for many reasons.
How breaches happen—and how they don’t
I may be oversimplifying this, but most major historical data breaches (insurers, credit bureaus, hospitals, retailers) succeeded not because attackers broke the encryption, but because they got hold of the decryption keys the company itself had to make accessible somewhere. (A decryption key is the piece of data required to convert encrypted information back into its original, readable form. Think of encryption as locking your data in a scrambled state, and the decryption key as the specific key that unlocks it. Without it, the encrypted data is just unreadable noise, even to whoever’s holding it.)
Here is a graphic I put together to help describe how this happens in some environments with different information security architectures and how a zero-knowledge password vault architecture is better:
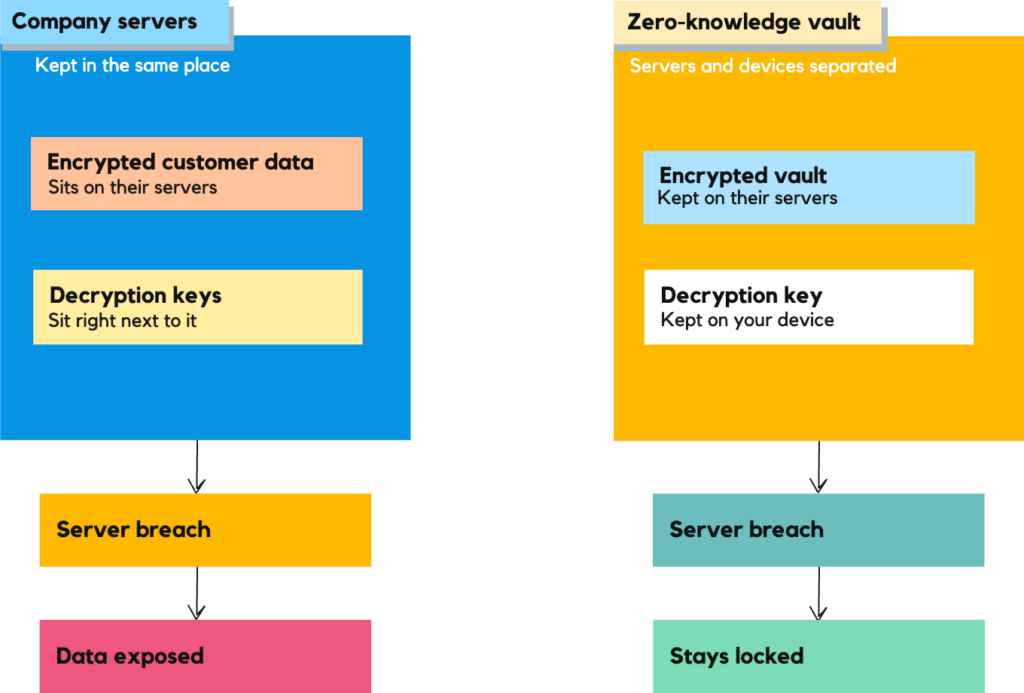
To compare them, let’s assume the same breach attempt occurs in two different scenarios. The difference lies entirely in what the attacker finds once they’re “in” (which is what actors on TV and in movies always say when they hack a system: “I’m in,” which usually takes much longer than the 10 seconds it does in the show or movie).
On the left, the data and the decryption keys to open it live in the same place (on the same servers or in the same data center, sometimes both), so a breach gives the attacker both halves of the solution together in one place, so the problem (access to the data) can more easily be solved at once, and your confidential data is compromised.
On the right, the provider with the zero-knowledge architecture only ever holds the locked box—the password “vault.” It’s called “zero-knowledge” because the provider—the company running the servers—has zero knowledge of the actual contents of your vault. Not “very little,” not “encrypted but technically accessible,” but actually none. The term comes from the broader concept of cryptography’s “zero-knowledge proof,” in which one party can prove something is true without revealing the underlying information.
The key that opens it (your decryption key) never leaves your device, so the same breach hands the attacker something they still can’t read because it’s encrypted, so your data “stays locked.”
Several reputable password managers (like Bitwarden and 1Password) use this zero-knowledge architecture: the provider never has your master password, your decryption key, or a decrypted copy of your vault. Decryption happens locally on your device using a key derived from your master password.
This is one reason why having a very strong master password is so important. If the vendor’s servers are breached but you use a strong master password, an attacker who steals the encrypted vault would almost certainly be unable to decrypt the information. Also, if you ever get word from the provider that a breach has happened, immediately change your most important passwords, then the rest as soon as practical.
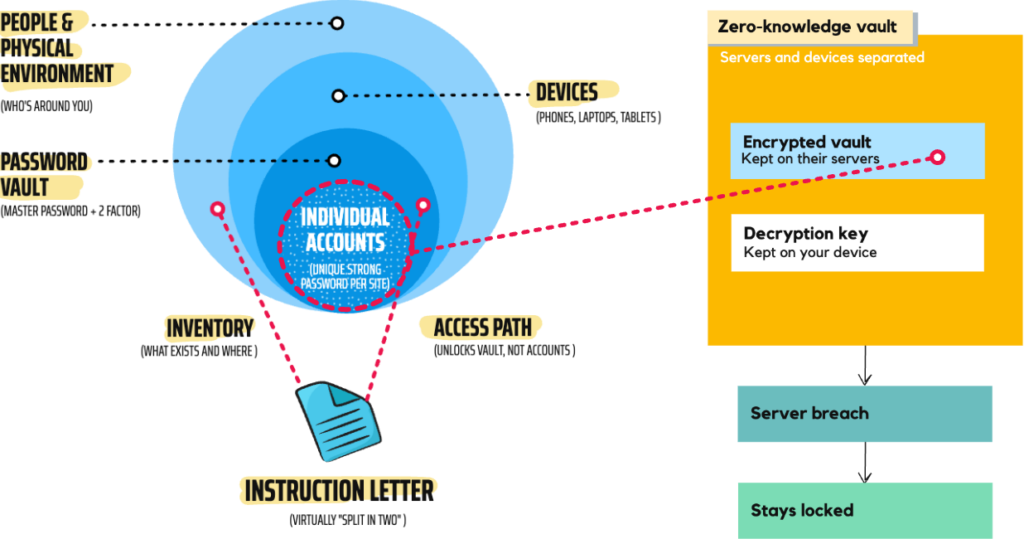
Your personal “security domains”
Now, let’s take this a little further to see how this fits in this particular context. Here’s another simple diagram illustrating this specific security problem domain of estate planning and communication to, and access by, your heirs, which includes several subdomains best understood as “nested layers” that could be compromised. The deeper the layer, the more damage a breach causes, which is why the strongest protection needs to be at the center, which was represented by the zero-knowledge vault in the previous diagram, and each outer layer is a chance to stop trouble before it reaches the next layer and the next. I’ll explain the best practices for protecting each layer in this context.
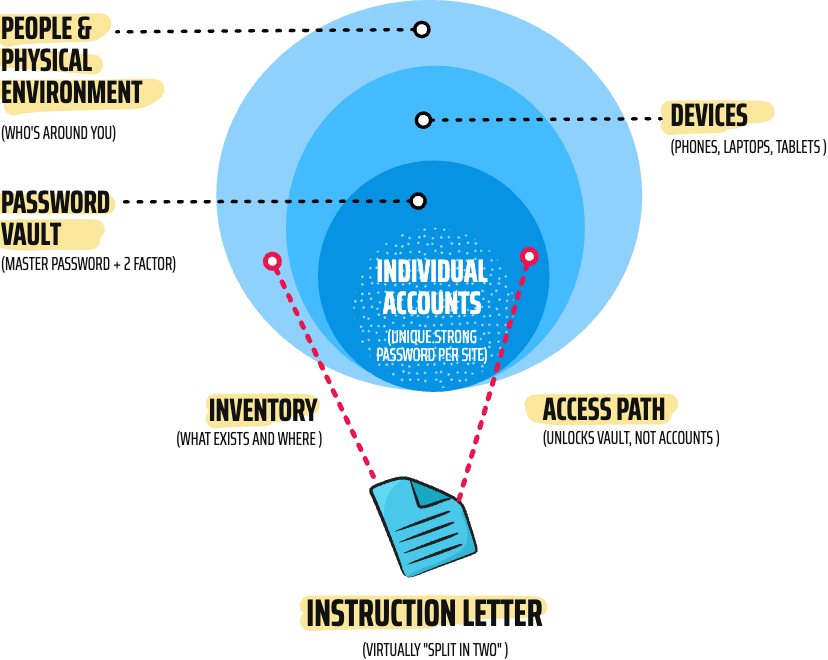
People & physical environment: This is the layer we are concerned about with the instruction letter. Protection here isn’t a password at all; it’s who knows what. Nobody should have the master password; instead, the people you trust should have a path to it (an emergency access feature or a sealed letter from an attorney—more on that shortly)
Devices: These include screen lock/biometrics, automatic OS updates, anti-virus/malicious software updates, and treating a lost or stolen phone as a “change my passwords now” event. This is basic device security, but it applies to ALL your devices.
Password vault: This is the highest-leverage layer, since it protects everything nested inside it (including information, user IDs, passwords, or a combination of both). A strong, unique master password plus a security key or authenticator app for two-factor is the layer worth spending the most effort on.
Individual accounts: Your user IDs and unique, auto-generated strong passwords per site (so a leaked site doesn’t cascade to other sites because of having the same password), and passkeys when available. (A passkey is a login credential that entirely replaces a password. It’s a cryptographic key pair generated and stored on your device—phone, laptop, or security key—where you unlock it with a fingerprint, face scan, or device PIN instead of typing anything. The private half never leaves your device, and it only works on the legitimate website it was created for, which is why passkeys resist phishing in a way passwords never can. Some sites offer passkeys, and some don’t. Use them if they do.)
And finally, there’s the information/inventory letter itself, which a lot of people want to give their spouse and their heirs, an instruction letter that, by design, provides a shortcut through all four layers at once. That’s exactly why it’s risky as a single, consolidated document—it collapses layered defense mechanisms into a single flat sheet of paper. Yikes!
The solution is to split it by putting the access ”map” in the letter, your site credentials in the vault, and vault access via the emergency-access-type feature, which includes everything you may have otherwise put in the letter. This split effectively turns the letter into two documents, each serving a different purpose.
The inventory half includes your account names, institutions, locations, and who to call. This is the low-risk half. It can safely live in the outer “people” layer—a fireproof safe or lockbox, an attorney’s file, even OneDrive or iCloud—because on its own it doesn’t unlock anything.
The access path half means that instead of writing “vault master password is _ _ _ _ _ …,” it says something like “use 1Password’s emergency kit,” or “use Bitwarden’s emergency access feature,” or “the vault credentials are with the attorney, to be released on presentation of the death certificate.” Notice the arrow skips straight past “individual accounts” entirely; your kids never touch a single-site password directly. They go through the vault’s own mechanism, which then reveals everything else.
Better than a Post-It-Note in a box
The actual credentials can live elsewhere entirely, and I recommend keeping them in a password vault (like 1Password or Bitwarden), not written into the letter itself or in a Post-it-Note in a lockbox. Definitely not on a piece of paper in a desk drawer. The letter then just says, “Everything is in the password vault; here’s how to get into the vault.” This is the way I have mine set up. That way, the letter itself is far less dangerous if seen by the wrong eyes, because it’s a map, not a set of keys to the kingdom.
That’s the real payoff of the split: even if someone finds the inventory half, they’ve learned what exists, not how to get in. And the access-path half, read alone, is nearly useless without also holding the actual vault credential or being an authorized emergency contact.
Here’s a combined illustration that shows the high-level “solution architecture” (something I used to deal with in IT):
The nested domains stay the same, but the vault layer now carries the zero-knowledge point directly on it: even in the worst case, where someone breaches the vault provider’s servers, what they get is unreadable without your master password. That’s what makes the layer worth trusting with so much responsibility in the first place.
And the letter split now points to the actual mechanism rather than a vague “somehow gets in” — the access-path half isn’t a password on paper anymore, it’s a way to get emergency access, which only works because of the same zero-knowledge design labeled just above it. But this is where things get interesting. You want to use your password manager’s built-in emergency access feature (as I described above), rather than writing the master password anywhere. However, these features are implemented differently depending on the password manager you use.
An emergency access feature is, generally speaking, a built-in security mechanism in which you name a trusted person in advance and grant them a path into your vault that doesn’t depend on you being available, capable, or even alive to personally provide the credentials. It doesn’t require you to have done anything at the moment of the emergency. A family recovery feature that needs the locked-out person to still be present and set a new password isn’t this; it’s self-service recovery, not emergency access.
1Password, which I currently use, is more like ”self-service recovery” than true emergency access. What it offers is Family Organizer, which enables me to add family members (in this case, my wife) to the system and grant her shared access. If I die, she would use her own 1Password access credentials to reach anything shared with her (and any shared “family” vaults), in addition to her own credentials. If we both die, or when she dies after I am gone, the procedure is driven by whether other family members can access the account using our Emergency Kit (and related recovery info), which is 1Password’s emergency access procedure.
The 1Password emergency “kit” is a PDF containing the sign-in address, email, Secret Key, setup code (QR), and a place to record the account password; whoever uses it can sign in to the deceased’s 1Password account at 1Password.com/apps or 1Password.com. With this setup, you only need the deceased person’s Emergency Kit (stored safely for the executor/trusted person), plus whatever the inheritor needs to use it (e.g., the printed account password written in the kit).
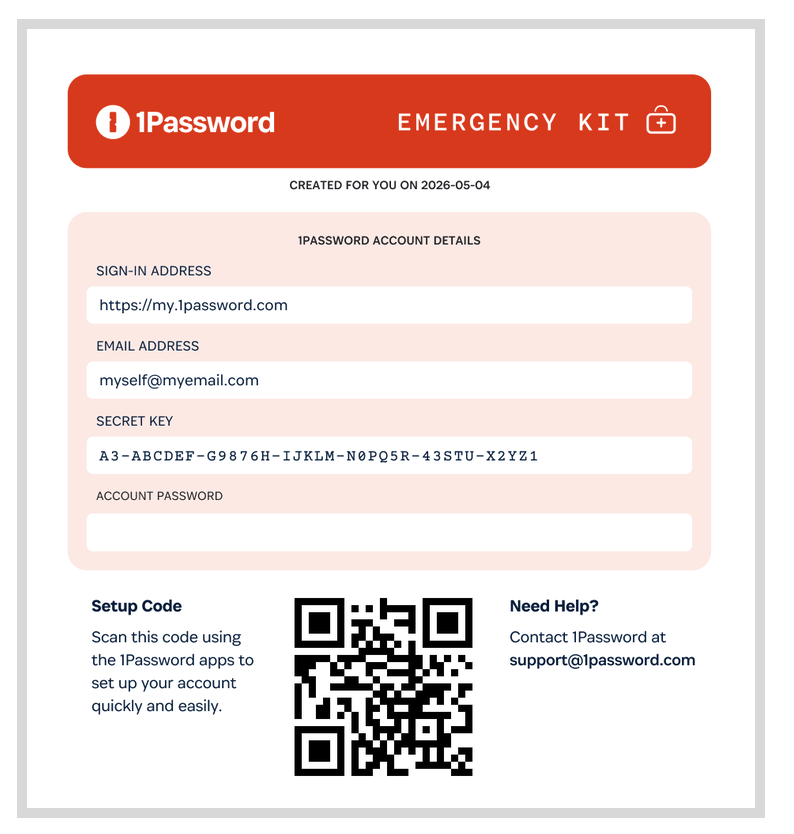
You may see the weakness of this. In my case, this ”Emergency Kit” ( a sheet of paper isn’t much of a “kit,” is it?) is stored in a fire safe, although it could be in a safe deposit box (which only a spouse or someone else who is a joint-owner may be able to access before probate) or with a trustee. But my letter, which tells a trusted party where the emergency kit is, is in a folder in a file in my desk, along with copies of our estate planning documents (the originals are in the fire safe), and a digital copy is also stored online. Which, now that I’ve thought about it, is ironic since someone has to get to the password vault to access iCloud Drive, where the documents are stored—still a bit of an Earl-and-his-Post-it-note problem. I’ve just moved the vulnerability up one level instead of eliminating it. If the letter is lost, destroyed, or forgotten, or if nobody thinks to look for it in my desk drawer, the fire safe might as well be buried in the backyard next to Earl’s lockbox.
Still, there is some safety in terms of what’s actually in the letter versus what’s in the safe. The letter only says, ”The emergency kit is in the fire safe in my office.” That sentence, by itself, unlocks nothing. Someone would still need access to the physical safe, the combination (or key), and my 1Password account master password or the security key, which are three separate things, none of which live in the letter itself. Compare that to Earl, whose Post-it note was the password. So the letter is still a critical link in the chain, but it only tells you where to look, not what you’ll find when you get there. It’s the difference between a treasure map and the treasure.
That being said, I don’t love that the whole thing still rests on my wife and the kids actually knowing the letter exists and where it is. Which is really just estate planning 101: at some point, you have to accept that you can’t fully eliminate the need for at least one document, safely stored and known about so that those you want to can easily access it. The goal isn’t zero risk; it’s making sure the thing they need to find first is harmless on its own.
When the time comes
Once the surviving spouse is gone, the executor (or trusted person) must have each spouses’s Emergency Kit so they can recover each 1Password account independently—one kit per account. That means that I have to prepare two kits (or otherwise ensure separate recovery information for each account).
In 1Password, the Emergency Kit enables a family member who has forgotten their password or lost their Secret Key to regain access to their own account. The catch with estate planning is that it requires the locked-out person to still be present and able to set a new password themselves. The organizer completes the process but doesn’t unilaterally gain access to someone else’s vault contents. There’s no waiting period/takeover mechanism that works if the account holder is deceased or unreachable. So, specifically for estate-planning purposes, 1Password alone doesn’t give heirs a way in without you having already shared the Secret Key and password through some other channel (a sealed letter, an attorney, etc.), which is really the gap the instruction letter has to fill for 1Password users like me.
I’ve already talked a lot about 1Password (since it’s what I use), but Bitwarden—and other managers such as NordPass, Proton Pass, and, to a much lesser extent, Apple Passwords—provide a truer ”emergency access” option. Here’s a summary comparison:
- 1Password — As described earlier, it uses a zero-knowledge architecture, meaning that your master password plus a locally stored Secret Key derive the decryption key on your device, so the company never has enough to open your vault, even under a subpoena or a breach. But it has no true emergency access feature. What it offers instead is Family Organizer account recovery: if a family member forgets their password or loses their Secret Key, a Family Organizer can help them reset and regain access to their own account — without ever seeing their vault contents. The catch for inheritance planning: this requires the locked-out person to still be present and able to set a new password themselves. There’s no waiting period, a request-and-approve mechanism that lets someone else in if you’re unreachable or deceased. For 1Password users, that gap is exactly what an instruction letter (or a sealed copy with your attorney) still needs to cover, since there’s no built-in path that opens the vault on its own.
- Bitwarden — As stated previously, it uses a zero-knowledge architecture, so even a full server breach would only yield unreadable, encrypted data. Its Emergency Access feature is vault-specific rather than whole-account: you name a trusted contact, choose View (read-only) or Takeover (they set a brand-new master password and gain full control), and set a wait time of at least 1 day. If you don’t approve or deny the request, access unlocks automatically once the wait time runs out. Of the managers covered here, it seems to be the most complete match for what “true emergency access” should look like: a designated contact, a real waiting period you control, and a mechanism that works whether or not you’re able to act. (I recently received notice that 1Password subscription fees are increasing. Bitwarden is much less expensive, so I may consider a change. It is relatively easy to export passwords from one vault to another using a CSV file.)
- NordPass — States it uses a zero-knowledge architecture where only the user can see the vault contents; it also claims the vault is encrypted locally before upload (so the NordPass team can’t see your passwords/notes without your key). NordPass offers a simpler, more limited version of emergency access: You invite a trusted contact (they need their own NordPass account); once they accept, they can later request access to your vault. You’re notified and can grant it immediately or decline; if you don’t respond, access is automatically granted after a fixed 7-day wait (no customization, unlike Bitwarden or Proton). The access itself is view-only: your contact can see your passwords and secure notes, but can’t edit, delete, or export anything; there’s no Takeover option like Bitwarden’s.
- Proton Pass — Uses the term zero-access encryption (a “zero-access”/zero-access-at-rest model) for its encrypted cloud data: it says only you can decrypt using your private key, and Proton can’t access the plaintext it stores. It folds emergency access into your entire Proton account rather than the vault alone; you can name up to 5 trusted contacts, set a wait time of 1 to 30 days, and they’ll be granted access automatically if you don’t respond to their request.
- Apple Passwords — Does not use zero-knowledge architecture and no vault-level emergency access, but Apple’s account-wide Legacy Contact feature lets a designated person request access to your Apple ID data (which includes Passwords) after your death, using an access code plus a death certificate.
- Microsoft Edge — Microsoft also has a built-in password manager that offers secure password storage, autofill, and cross-device syncing. However, it is widely recognized to have fewer features than Apple’s dedicated Passwords app. Microsoft’s emergency access approach is to set up separate emergency (break-glass) accounts and use passwordless methods such as passkeys (FIDO2) or certificate-based authentication, then keep the credentials registered and exempt from Conditional Access blocking. This applies across all Microsoft applications, including Edge.
Some additional thoughts
If you still want a physical/digital backup of the master password itself, split it rather than store it in its entirety. Write half the master password (or a strong hint) in the letter, and give the other half to a sibling, attorney, or trusted friend. Or store one half in a safe or safe deposit box (keep in mind its limitations), and the other digitally. Neither piece alone unlocks anything.
Also, if you store the letter online, encrypt it, and don’t store the encryption password in the same place as the letter. That encryption is only as strong as its password, so the fix isn’t “no encryption,” it’s “don’t co-locate the encryption password with the file.” Keep the file on a reliable network drive, encrypted if you like, and give your kids the decryption password verbally or through a separate channel (a card in a safe or, if appropriate, a safe deposit box, or to your attorney, to be released only upon your passing).
Consider your attorney as the actual custodian. Many estate attorneys will hold a sealed letter of instructions with the rest of your estate documents, to be opened only at the appropriate time. This solves the “sitting in OneDrive forever” problem. It exists, but it’s not exposed day-to-day.
The honest bottom line: you can’t get this to zero risk; leaving the information to someone requires that someone eventually holds the keys. But you can make sure no single document, and no single moment of carelessness, hands over everything at once. That’s really the same principle as not sharing your master password with your kids while you’re alive: graduated, layered access, not one skeleton key.
Putting it all together
If you take nothing else from this piece, take this: security isn’t about finding a single perfect document or an unbreakable password. It’s about making sure no single point of failure—a lost letter, a stolen laptop, a phished login—can undo everything at once. Household security is only as strong as its weakest link, and everyone in the house needs to follow the same practices, not just whoever happens to be the most tech-savvy.
Practically, that means layering a few habits on top of the instruction-letter split we’ve walked through. Use passkeys wherever a site offers them, since they can’t be phished the way a password can. Let your password manager do its quiet, unglamorous job of refusing to autofill on a lookalike site; that’s not just convenience, it’s an active defense against the scam emails and texts that account for most real-world losses. And if you’re willing to take it a step further, a physical security key raises the bar again: even someone who has your master password still can’t get in without the device itself, which is exactly why it’s worth owning more than one, kept in different places, the same way you’d want more than one copy of anything else you can’t afford to lose.
None of this eliminates risk entirely; nothing does. But it does something better than a false sense of total security: it spreads the risk out, so that no single mistake, theft, or forgotten combination becomes the whole ballgame. Given that cybercrime losses for people over 60 topped $7.7 billion last year, up roughly 60% from the year before, the case for spending an afternoon on this is no longer in question. The only question is whether you do it now, on your own terms, or later, in a hurry, after something’s already gone wrong.